

English: Mirror sailing dinghy (Photo credit: Wikipedia)
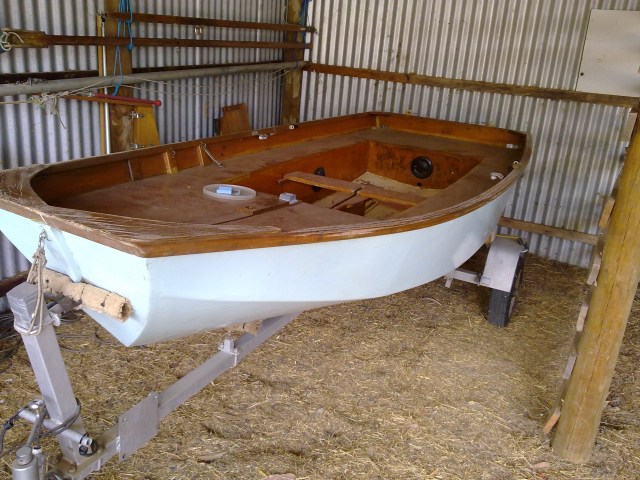
Current situation involves restoring to a safe condition, Mirror #41569, and hopefully enjoying some hours on the water, (hopefully not too many IN the water). [Above photo for reference, from Wikipedia”]
This dinghy comes as a virtual gift from a “family member” as the owner son moved interstate and has moved on regarding this craft also. It was originally owned by a previous generation member and it has now come to a new home. Perhaps I am being over optimistic in thinking I am still “young” enough and fit enough to again be active in dinghy sailing but it will be great fun to put it back in the water after 15 years of storage for the boat, and about 40 years of retirement from dinghy sailing for me. It will, in any case, be useful and fun for my daughter who has some past enjoyable sailing experiences and will enable the facility for my grandchildren to learn about sailing while I am still about.
We had a Mirror when my kids were very young but the opportunities to fully benefit were limited. Prior to that, as a teenager, I learned and sailed for some years, mostly in/on a Moth. More about that elsewhere on these pages.
So besides its restoration and re-use being a practical, useful and therapeutic excercise, many memories are being revived. The boat has arrived un-named, I am thinking of naming it “Memories”. Perhaps it will become a material memorial for me as well as its original owner, Alan Scott.
References:
Cairn Curran Sailing Club http://www.ccsc.org.au/index.html
The closest very suitable venue, can’t wait to get into the water.


Mirror Class Association of Victoria, c/ 64 Electra St, Williamstown, Vic, Australia Maree.Fitzpatrick@vu.edu.au
The Mirror Class Association of Victoria https://sites.google.com/site/mirrorsvic/home
The History of the 125 – Australian 125 Sailing Dinghy – National …
www.125assoc.com/history.asp – Cached
Research phase – Rigging details, once a piece of cake, but now needing some guidance, in particular with the spinnaker.
http://www.125assoc.com/default.asp
Mirror Tuning Guide : http://www.speedsails.co.uk/docs/Mirror.pdf
Restoration project: http://www.mirror849.piczo.com/?cr=6
Fibreglass repair information: http://www.westsystem.com.au/files/fibreglass_boat_repair__maintenance.wooden_boat_building/wooden_boat_restoration_and_repair.pdf
Mirror Book, Mirror Sailing Start To Finish
$42.95
Code: 51745
Author: AITKEN & DAVISON

The Mirror is one of the UKs best-loved dinghies. This book teaches you how to sail and race one and how to get the best out of it. The Mirror dinghy is a British sailing icon and continues to evolve, keeping up with modern sailing technology and requirements. Written by the national UK Mirror Coach, this fully illustrated book covers everything you need to know including rigging, sailing theory and practice, reefing, launching and landing, capsizing, racing and transportation. It also includes four master classes which aim to get the reader to advanced racing standard. This is the only book youll ever need to sail your Mirror. Fully illustrated with step-by-step photography. It teaches everything from the essentials of sailing theory and rigging, through faster upwind and downwind sailing, to racing tactics and how to outsmart the opposition. 170 pages PB.
Ref Boat Books: http://www.boatbooks-aust.com.au/index.php
This is a very basic guide to rigging a Mirror dinghy aimed at those new to the class.

Mirrors have two different rigs, the Gunter rig which is the traditional rig comprising a short mast (about 3290mm long, almost exactly the same length as the hull), a wooden gaff and a boom. Most Mirrors, particularly older boats, have this rig.
More recently the Bermuda rig has been adopted comprising a longer (about 5m long) alloy mast and boom.A sensible order for putting it together is as follows:
Turn the boat so it is facing into the wind. Check all the buoyancy tanks with drain holes have bungs fitted. Don’t forget the forward buoyancy tank drain holes. There are two of these, and they are inside the stowage cuddies (one on each side).
There should be 3, long (about 3300mm), wire ropes. Two of these should be the same length. The two equal length ones are the shrouds.The other one is the forestay.
If your boat has a Gunter rig there should be a short wire rope, about 175mm long with a loop in each end. This is the jib halyard strop. The larger loop passes over the top of the mast so it hangs over the forward face of the mast (the gooseneck fitting is on the aft face of the mast).The smaller loop should have a block (pulley) attached to it. The jib halyard should be threaded through the block from bow to stern.
With the Bermuda mast the jib halyard should already be running up inside the mast and emerging just below the forestay.
At this stage loosely tie the ends of the jib halyard together to stop one end getting out of reach.Loop the two shrouds over the top of the mast (Gunter rig), or slot them into the “T” terminal holes on the sides of the mast or attach them to the shroud tags with clevis pins and rings (Bermuda mast). Loop the forestay over the top of the mast (Gunter rig), or slot it into the front “T” terminal hole or attach it to the forestay tag with a clevis pin and ring (Bermuda mast).
If you have a Gunter rig, attach the main halyard onto the metal band which is about half way along the gaff. Thread the other end of the main halyard through the pulley at the top of the mast with the halyard running from stern to bow.
If you have a Bermuda mast the main halyard should already be running up inside the mast and emerging right at the top of the mast. Tie the end of the main halyard around the mast below gooseneck level to stop it going astray.Attached the shrouds to the aft (back) shroud attachment points on each side of the boat. These may attach with shackles or with clevis pins and rings. Some boats only have the aft shroud attachment points.
If you have a Bermuda mast, put the burgee (flag) into the burgee holder at the top of the mast.
Set the mast upright in the aft mast step (near the back edge of the foredeck).
Fasten the forestay to the forestay attachment fitting in the middle of the bow transom. Typically this is done by tying a piece of line to the end of the forestay, running this down to the attachment fitting, back up to the forestay and back down again, this is repeated twice more, finishing at the end of the forestay. By pulling on the line the forestay and shrouds are tensioned. A knot is tied to maintain the tension.
Check the mast. Looking from the front of the boat it should be upright. If not you need to check the shrouds as equal in length. Looking from the side of the boat, it should be almost upright, sloping back slightly (this slope is known as mast rake) so the top of the mast is nearly over the front of the daggerboard case. If not you may need to change how the shroud attaches to the hull to lengthen or shorten them. Some boats have a range of positions for attaching the shrouds, so the mast rake can be set more precisely.Loop the kicking strap over the boom, or attach it if not attached already.
Attach the boom to the mast with the gooseneck fitting. Thread the mainsheet.
Mainsheet systems vary. The most common system on Gunter rigged boats is an aft mainsheet. On this system the mainsheet starts on the port side of the transom (normally threaded through a hole where a figure of eight knot is tied), then up through the block on the end of the boom, then down to the block on the starboard side of the transom, and then to the helmsman’s hand. If the boat has centre mainsheet, it is probably easier to start at the block adjacent to the thwart and daggerboard case, then up to the block on the boom, along the boom, passing through the constraining loop or boom sleeve, to the block at the end of the boom and then down to finish on the bridle.
On some boats there is a block on the bridle, in which case the mainsheet goes through this block and then come back up to finish on the becket of the block on the end of the boom or on the boom itself.
Attach the rudder and tiller to the transom.
If you have a Gunter rig, slide the head of the mainsail into the slot in the gaff by the gaff jaws and then slide it up the slot and fasten the head about 76mm from the top end of the gaff (there should be a painted band at this point) with a short length of line. There should alsobe a short length of line or elastic tied to one of the gaff jaws.
If you have a Bermuda rig, attach the main halyard to the head of the mainsail.Insert the sail battens (thin end first) into the batten pockets. The top batten is shorter than the lower two.Fasten the clew of the mainsail to the end of the boom. There maybe a track on the boom for this, otherwise use one short piece of line around the boom and another piece from the clew to the end of the boom.
When set, the bottom of the sail should not be more than one hand’s width vertically from the boom. You may need to make final adjustments to this once the mainsail is hoisted, laced and the downhaul set.With a Gunter rig, attach the burgee to the top end of the gaff. Then start to pull up the main halyard in which will raise the gaff with mainsail attached. This has to be done in stages. With the gaff jaws hoisted above the gooseneck and any spinnaker pole ring, tie the line or elastic attached to one of the gaff jaws to the other gaff jaw so the gaff jaws cannot jump off the mast.
Needless to say, an extra pair of hands is needed to do this. Otherwise, you will need to cleat the main halyard at each stage. Start lacing the luff of the mainsail from the eyelet below the gaff jaws around the mast. A plain spiral is commonly used for this.
Pull the main halyard up some more and continue lacing until you reach the lacing eye above the tack of the sail. The aim is to have the leading edge of the sail straight, so it needs to follow the line established by the gaff. Having the mainsail about two fingers width away from the mast. The tension of the lacing should be adjusted to achieve this should do this. At this point finish the lacing, passing the line around the mast and tying it off (round turn and two half hitches) at the lacing eye above the tack. Pull the gaff up fully. Make sure nothing (kicking strap, mainsheet,….) is stopping the boom from rising. The tack may end up 200mm or so above the boom, this is quite normal.With the gaff right up and as vertical as possible, cleat the main halyard.
With a Bermuda rig, thread the head of the mainsail into the groove on the back of the mast and pull up the main halyard until the sail reaches the bottom of the black band at the top of the mast.The tack of the mainsail is held down with a line called a downhaul.This should be attached now.The tack of the mainsail is held near the mast by another short piece of line (Gunter rig). The exact position of the tack will depend of the cut of the sail. It is best to experiment to find a position that gives the fewest creases and the best mainsail shape. There is less need for this line on a Bermuda rigged boat, but it can be useful in heavy winds with a lot of outhaul tension.With the tack of the mainsail set, the exact position of the clew of the mainsail can now be adjusted and finalised.·
The kicking strap can now be set. As a general rule, in light winds, no tension. In medium winds a small amount of tension. In heavy winds, lots of tension. On a basic boat you may not have any means of adjusting the kicking strap, just a knot (round turn and two half hitches) where it attaches to the bulkhead under the mast.
Attach the tack of the jib to the forestay attachment fitting with a short length of line or a shackle. The tack of the jib should be roughly level with, or below the bow shapes.Attach the jib hanks to the forestay, starting with the lowest one.Attach the head of the jib to one end of the jib halyard. If one end of the halyard has a loop, use that end with a shackle. If neither end has a loop, use either end and tie a bowline.Attach the jib sheets to the clew of the jib. In general, the jib sheets are a single length of rope attached to the jib half way along. In some cases there is a loop half way along which passed through the cringle at the clew and both ends are passed through the loop. You can do something similar even if there is no loop.
Another method is to tie a figure of eight knot in the middle of the jib sheet, thread one end through the cringle, pull the knot up to the sail and tie another figure of eight knot on the other side of the cringle. Thread the jib sheets through the jib fairleads.
The sheets should go inside the shrouds. Tie figure of eight knots in the ends of the jib sheets.Hoist the jib by pulling the jib halyard. In light to medium winds the halyard should be just hand tight. In heavy winds have the halyard much tighter.
Put the daggerboard in the boat ready for use.
The boat is now ready to launch.
==============ooooooooooooooooooooooo============
Restoring some minor damage and making it look good:
- Phase 1. needs some maintenance. Getting prepared !

Rigging Restoration: (Gunter rig, with gaff).
First major work – Replacing corroded galvanised wire shrouds and fore stay with SS. Today, 19/12, with access to a wholesale supplier workshop, the 3 mast stays were re-created using 1/8″ 7/19 SS wire cable. This is heavier than the recommended minimum, but we are not into racing, just leisure and fun. Also replaced was the short Jib halyard pulley masthead cable fitting.
A satisfying start, next, the rope items – halyards and main sheet. Jib sheets look ok. Not sure about the spinnaker sheets yet. After more recent experience on a 10 metre keel yacht, the spinnaker sheets are like sewing thread by comparison.
Hull repairs:
21/12: Last two days – progress in sanding back the deck and cockpit but a fair bit to do still. With assistance from C.H.Smith Marine, Collingwood, Melbourne, have now acquired new rope items, halyards, mainsheet and sundry items. Spinnaker halyard and sheets in good order, don’t need replacement.
Should be back into restoration action after Xmas festivities.
27/2: A few more hours on sanding cockpit. More damage than first realized – the top, forward corner of the centre-board box is coming apart. Sanding varnished surfaces reveals variations in layer adhesion – in some areas will have to strip down to base.
10/2: A few more hours. Stripping in progress. Tedious and slow but looks effective. Floor of cockpit had a rough top coat of paint over the varnish – another time-consuming job. Soldiering on, good excercise for the heart, I expect.
Must remember to take another photograph.
Related articles
- Learning to sail. Part #2 (trooperstale.com)
- Building a dinghy for myself this winter/spring. (jstarboat.wordpress.com)
- Learning to sail. Part #3 (trooperstale.com)
- Learning to sail. Part #1 (trooperstale.com) [Included here just for fun, I reckon I know how, BUT one never stops learning, especially about sailing. Now I have found time to read this story, I have a tear in my eye, and that is “salt water”, not an injury].


It is pleasant too see so many views of this page, even a like, (thanks Desert Rose, you now have an invite to come sailing with me).
If anyone was hoping to see progressive updates on the restoration and getting on the water, let me say that so am I. Yet too many other interests and family commitments have virtually stalled progress.
This is worrying because our summer weather is unreliable as it is and will be soon over.
Still, Autumn is usually warm and more settled here in Victoria, Australia, BUT, the current weather does not induce any great expectations of ‘global warming’. I am hoping that a cooling phase is not in fact under way.
I will return soon with RESULTS, soon hopefully!
I am renovating a pre-loved Mirror also, I have so far sanded, filled and re-fibreglassed-taped some areas and am hoping to finish sanding and do the primer-undercoast this weekend, and finish the top coats over the next 3 weeks, weather permitting. Look forward to seeing your progress.
Hi Ferny, thanks for making contact.
I think you might be a bit ahead of me, partly because I am working on the boat part time in the country and seem to always have conflicting priorities.
I need to get myself into gear and move the boat up the priority list before the weather starts to cool.
Good luck and enjoy!
Nicely picturised.\
Thank you for following me. I too am following you with immediate effect.
Thank You Neelkanth.
Having difficulty in finding time to finish the yacht, but when I do, I will be excited about the resulting photos.
And of course going for a sail.
Thanks for following, it makes learning a lot of fun, about things I would never have known about.
Regards, Ken.
Dear Ken,
Ferny failed to note that you’d be welcome to join us at the Mirror Dinghy Discussion Forum (www.mirrordiscussforum.org) and have your boat entered in the Roll Call (http://www.hirsinger-translations.de/gast/boating/mirror_rollcall.pdf) if you wish.
I hope your restoration project is very successful and that we’ll soon be reading of Mirror Adventures down under. Age is no hindrance, as long as you don’t try to break records like Tony Clee proved when (at age 80+ ) he sailed from the Scilly Isles to Cornwall in a Mirror.
Hi Gents,
I have recently completed refurbishing a Wooden Optimist Pram, originally measured in September of 1983.
For my sins I have now started on a Mirror Pram “hull Number 54758”, which needs an excessive amount of work, I have started Sanding the interior, and have had to cut out parts of the gunnels and replace, there is a hole through the Hull, just in front of the Aft buoyancy tank, which I have cut out with the intention to repair, when stripping is complete.
I will prepare the boat with a white glatex 8 undercoat, Paint the boat white with glatex 8 paint and hardener, and then epoxy the entire boat with a 106 resin, and extremely fine mesh where required.
It looks like I may have to replace the Dagger board casing, and or repair.
I will post photos of current state and completion.
Kind Regards
Anthony Money
Johannesburg
South Africa
Wow, that “Moth” looks like something else? Cheers Jamie.
@Anthony Money: my account of a messabout meet in 2012 (http://mirrordiscussforum.org/documents/stories/jf2012english.pdf) contains a fairly detailed description of a daggerboard case repair job, in case that’s any help to you, but you have probably finished, as it has been a few years since anything was posted here.
Ken: any pictures of recent exploits or are you on the FaceBook Mirror site or the Mirror Dinghy Discussion Forum?
Cheer! Gernot
Thanks Gernot, a very useful comment. I have been extremely slack in my restoration progress. Many reasons, too many higher priorities.
When active in this project again, I hope to contribute more info.
Best regards, Ken.
Hi, I am refurbishing a Mirror, and having to make a new centreboard, rudder and gaff jaws.
The hull is good, as are the spars.
The centreboard is cut and about to be put together. I have started the rudder blade (using hardwood plywood from a Dutch mill in Fiji, which makes really high quality ply), I have the tiller and housing.
Please can anyone provide the dimensions of gaff jaws, or a photo of existing gaff jaws that includes a scale or ruler?
Let me know again if you still haven’t received the info in a week.
I will be able to help after that.
Hello Andrew,
You may find some more information on the Forum (www.mirrordiscussforum.org) if you post your question there in the “repairs and maintenance” section.
Wishing you much success!
Gernot H.
(Forum admin)
Andrew: here’s the picture with the rough dimensions. I was in a hurry so I didn’t use straight edges to find the real meeting points of the triangle sides. I did use a tape measure, though, and guessed as to the absolute lengths beyond the radii.
See http://mirrordiscussforum.org/pictures/tech_details/gaff_jaws.png .
Remember that the mast is thicker than the gaff so you have to add a spacer pad on each side between the jaw and the gaff itself.
Cheers;
Gernot